How to Use Floot's Internal Publish to Test Your App Before Launch

In my previous tutorial, I built Gift Finder, an app that suggests gift ideas based on who you’re buying for, your budget, and the occasion. With the help of Floot, I turned this web app into an iPhone app and installed it through TestFlight.
Before building the next round of features, I wanted to find out whether people could easily understand the app’s flow and how everything worked on their own devices. So I used Floot’s internal publishing feature to invite a friend and a team member to beta test the app and share their feedback.
Based on their feedback, I could improve the app further before eventually submitting it to the Apple App Store.
Floot lets you publish your app privately, so only the people you invite can access and test it.
Since Floot already hosts your website, you don’t need a third-party hosting platform or a separate deployment just to run a beta test. You can click Internal publish, invite the people you want to test your app, and share the link with them.
Internal publish controls who can open the app. It doesn’t record what testers do once they’re inside.
For that, I relied on Gift Finder itself. The app saves certain user activities in its own database, so I could review those recorded actions to see how my testers used it and spot friction along the way. Anything the app didn’t record, I couldn’t see.
1 Understand internal publish
When you publish internally, the app is available at its usual published address, but only collaborators and people on your invitation list can open it. Invited users sign in with a Floot account using the email address you added.
If you only want to test your web app with invited users, you can keep Publish mobile app turned off. Publishing internally will update your private website without using any mobile build allowance.
However, if you want to test your iPhone app through TestFlight, you need to turn on Publish mobile app and then click Publish internally. This will generate a new mobile build and count towards your monthly mobile build allowance. In today’s tutorial, I first invited a friend to beta test the web app, and then invited a team member to test the mobile version through TestFlight.
Here's how Internal Publish works:
| Testing scenario | Publish mobile app | Uses mobile build allowance? |
|---|---|---|
| Test web app privately with invited users | OFF | No |
| Test iPhone app through TestFlight with a new build | ON | Yes |
| Test Android app with a new build | ON | Yes |
| Update private website only | OFF | No |
| Continue testing an existing TestFlight build without rebuilding | No new build needed | No |
2 Test the website with a friend
First I wanted a friend to try the basic Gift Finder flow through the web version first. Internal publish let me share a working website without making it public, so I could collect some initial feedback before moving on to the new features.
-
Open your Floot project and click Publish.
-
Select the Internal publish tab.
-
Add your friend's email under Invited users. Use the email address they will use to sign in to Floot. Floot can also email the private-app invitation to them from the Publish screen, so you don’t have to send the link yourself.
-
Leave Publish mobile app turned off for this browser-only test.
-
Click Publish internally.
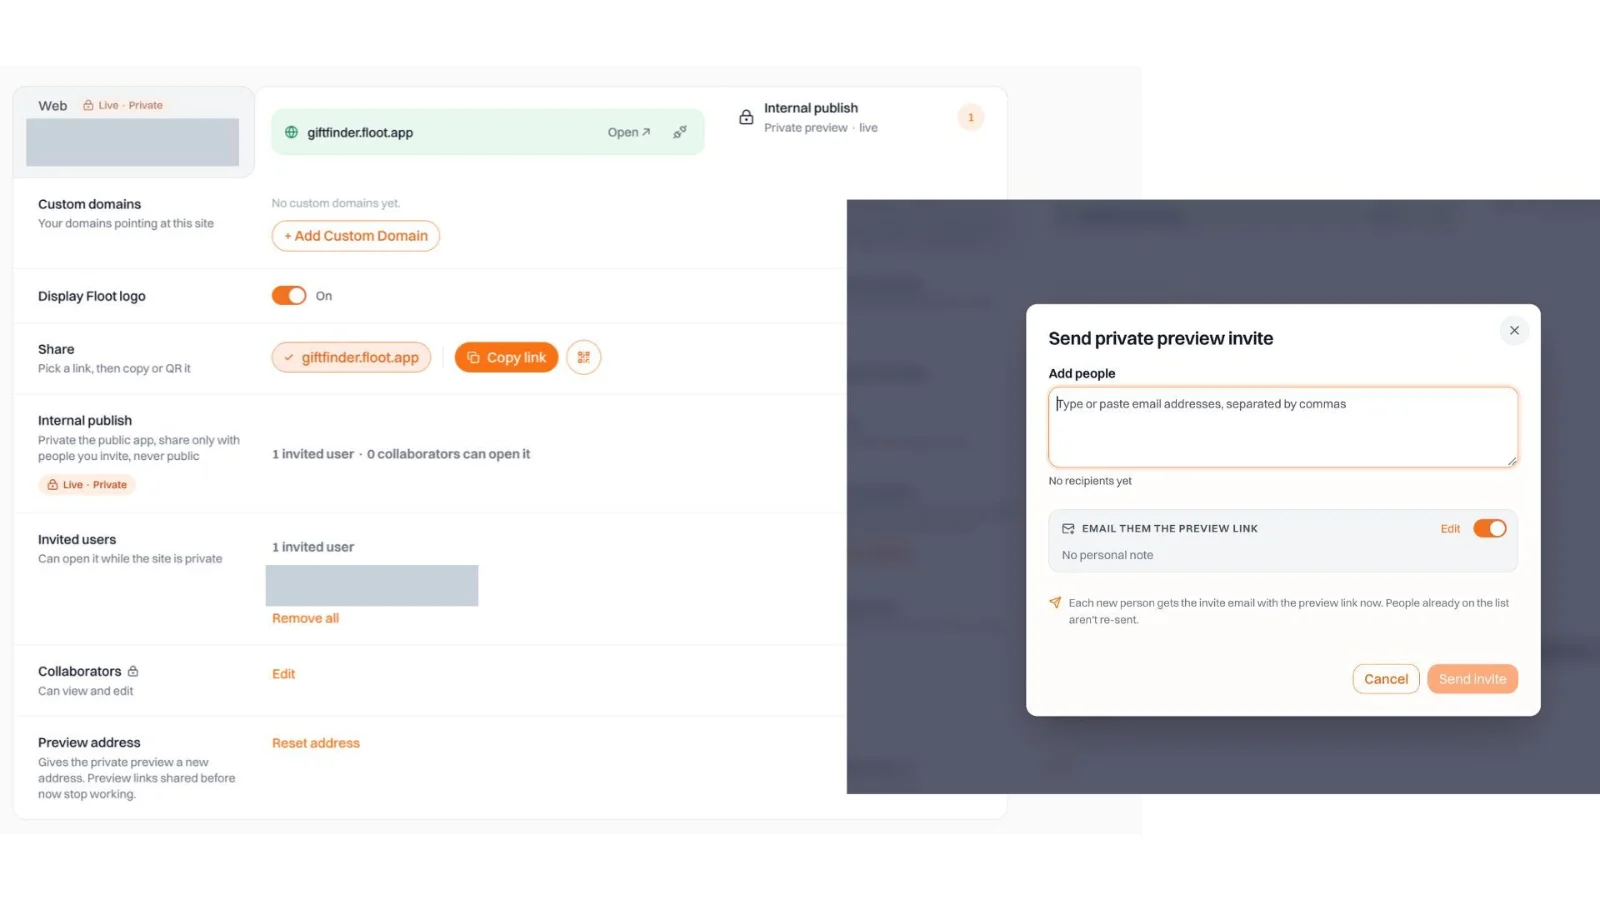
Figure 1 Left: One person is on the Invited users list for the private website. Figure 2 Right: Clicking the email icon opens the invitation dialog, where you can add more email addresses and send them the private preview link.
When the private publish finishes, your app is ready for invited testers to access. You can let Floot email them the invitation directly from the Publish screen, or copy the private website link and share it yourself. If the project was previously public, confirm the change to private when Floot asks.
My friend could open the private app through Floot's email invitation or the website link I shared. Either way, he needed to sign in to Floot using the email address I'd invited.
If he didn't have a Floot account yet, he would need to create one first. Anyone who hasn't been invited cannot simply access the private website just because they know its URL.
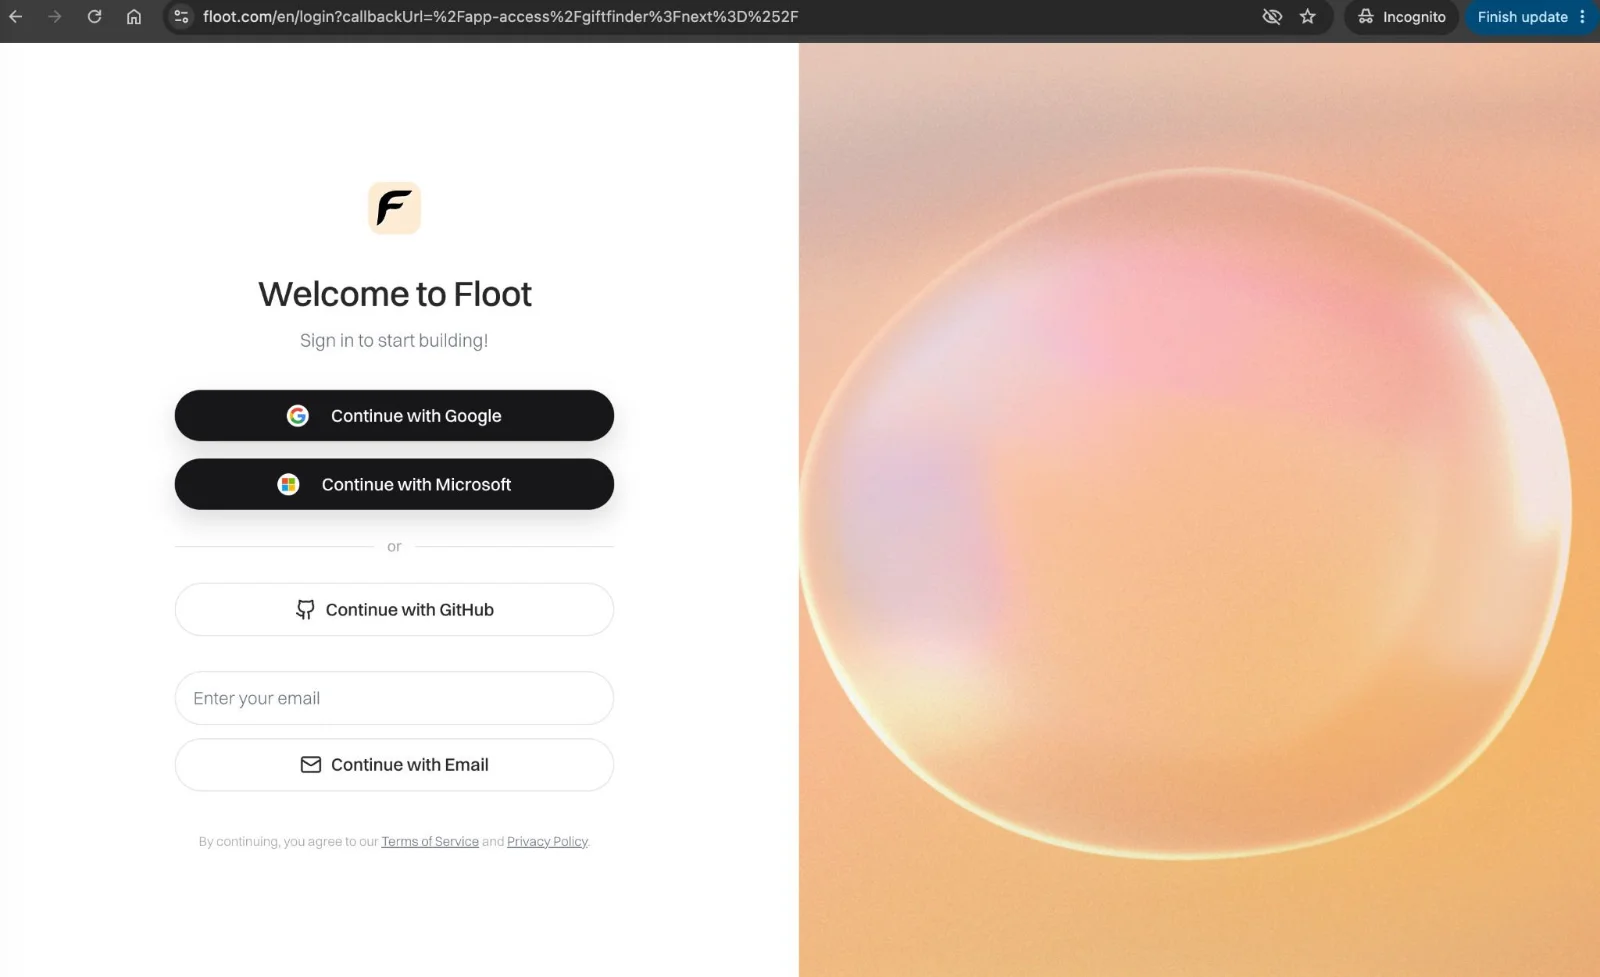
Figure 3 An invited friend signs in to Floot before opening the private website.
Ask them to try the task
I asked my friend to describe someone they were buying for, choose gift categories, enter a postcode, generate suggestions and save a gift.
One thing my friend noticed was the position of the Use my current location button. In my first version, the button sat below the entire form, separated from the ZIP/postcode field it belonged to. My friend suggested moving the button closer to the ZIP/postcode field so that the relationship between the two would be more visually obvious and intuitive.
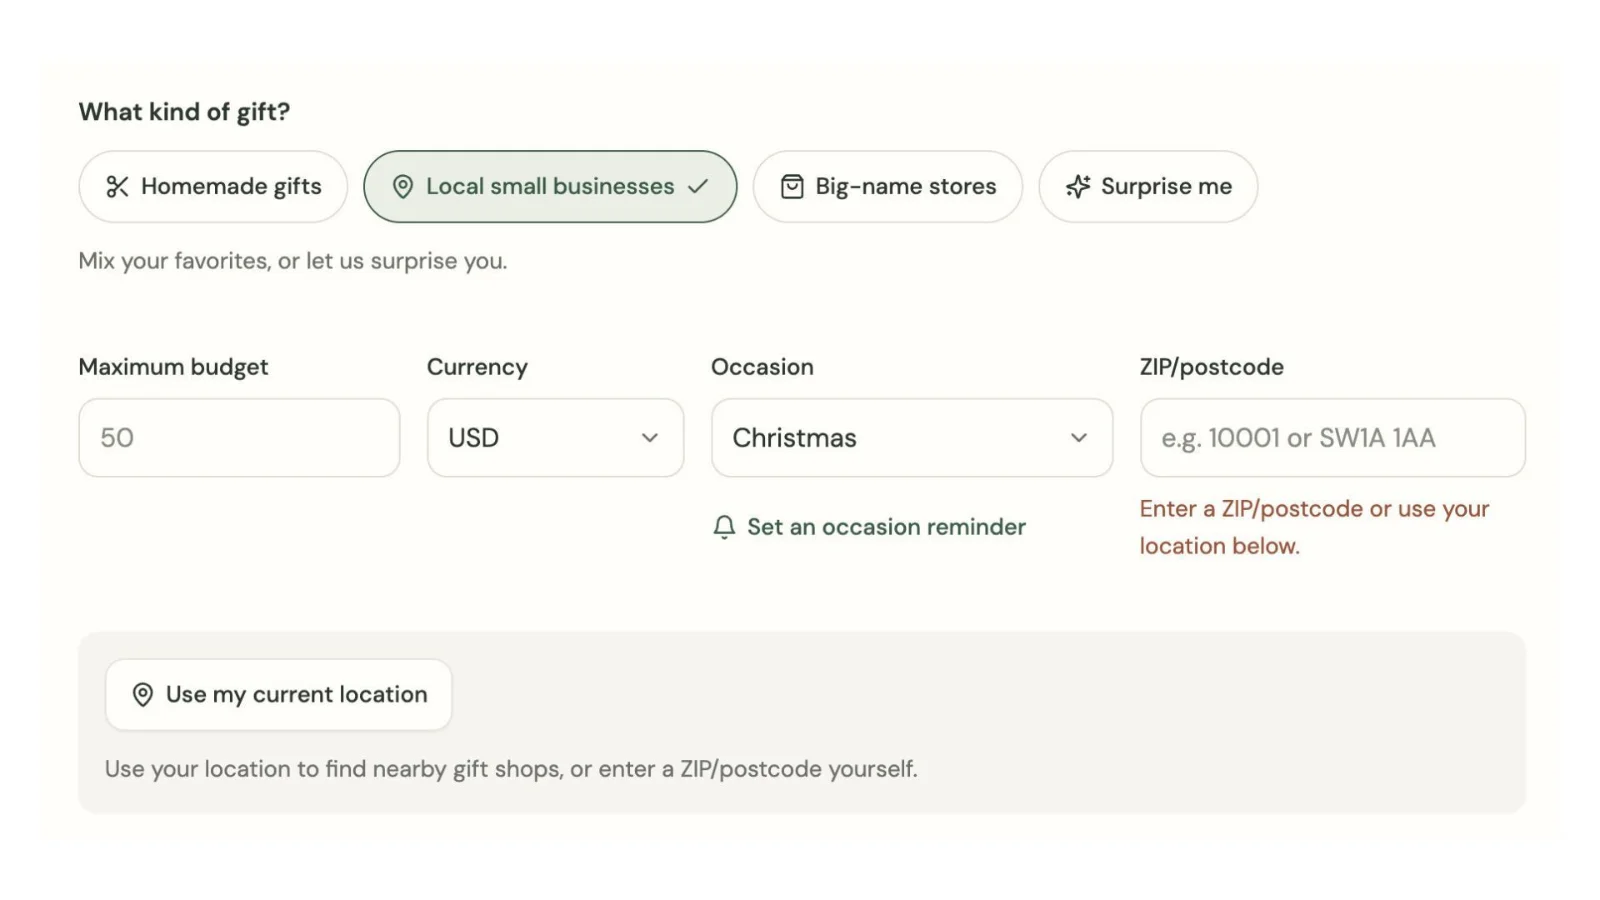
Figure 4 Before feedback, Use my current location sits below the form.
I asked my assistant to move it beside ZIP/postcode and checked the new arrangement in preview.
Ask your assistant:
Move “Use my current location” beside the ZIP/postcode field on desktop and mobile. Keep the postcode editable and preserve the existing permission and manual-entry behaviour. Do not change the rest of the form.
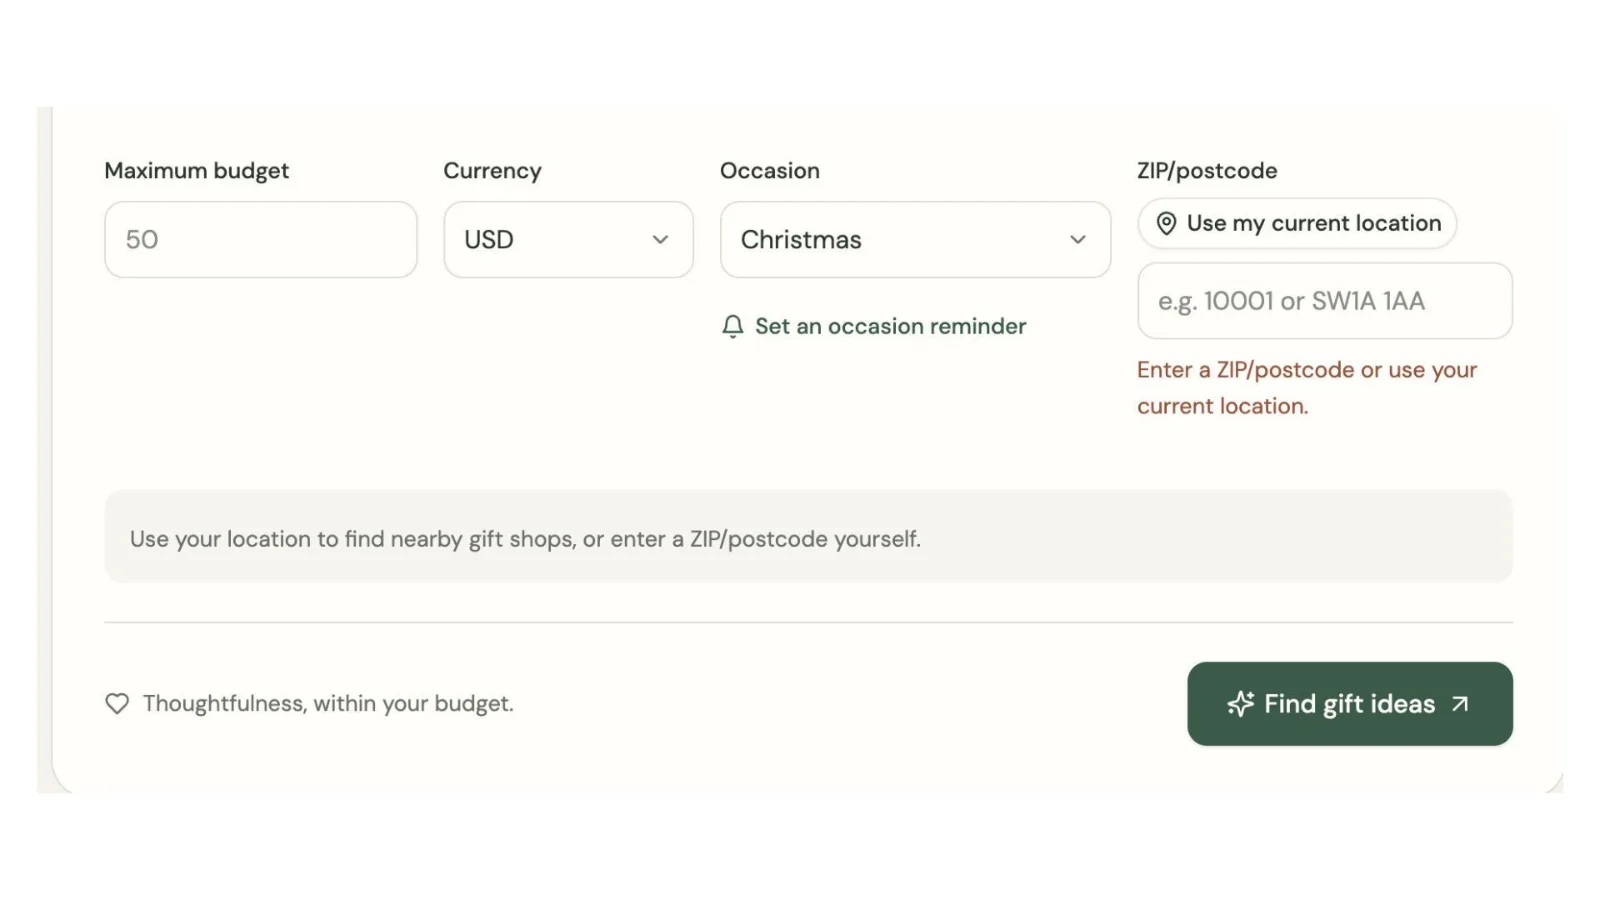
Figure 5 After the change, the location button sits beside the ZIP/postcode field.
The improvement was visible in preview, but a preview change is not automatically an update to the published website or an installed iPhone app. I can publish internally again, with the mobile switch off, when I want my friend to check the revised website.
3 Test two new iPhone features
After the first round of feedback from my friend, I also wanted to invite one of my team members to test the app and get their thoughts. My teammate suggested two additional features that I thought would make Gift Finder more useful.
The first feature notifies me when someone visits a wishlist I've shared. The second allows me to save something I discover in another app directly to Gift Finder, without having to copy and paste links back and forth.
Unlike the previous UI improvements, these two features require deeper integration with the iPhone. A browser preview alone wouldn't be enough to confirm that they work as expected.
So, I first built both features in Floot, tested what I could in the web preview, and then installed the updated app through TestFlight to test the native iPhone functionality.
Feature 1 Notify me when someone views my wishlist
Ask your assistant:
Add a “Notify me when someone views my wishlist” control on the wishlist page. When a signed-in owner enables it, request notification permission at that point, not on app launch.

Use Floot's push notification integration for browser and native iPhone delivery. When another person successfully opens that owner's active shared wishlist, send the owner a push notification with the title “Your wishlist got a visit! 🎁” and the body “Someone just viewed your shared wishlist.”

Store the owner's notification preference and ensure only that owner receives the event. Identify any Apple setup or new native build needed.
The project preview showed push notification support while I worked on the feature. That is useful for checking the interface, but it does not prove native iPhone push is configured correctly.
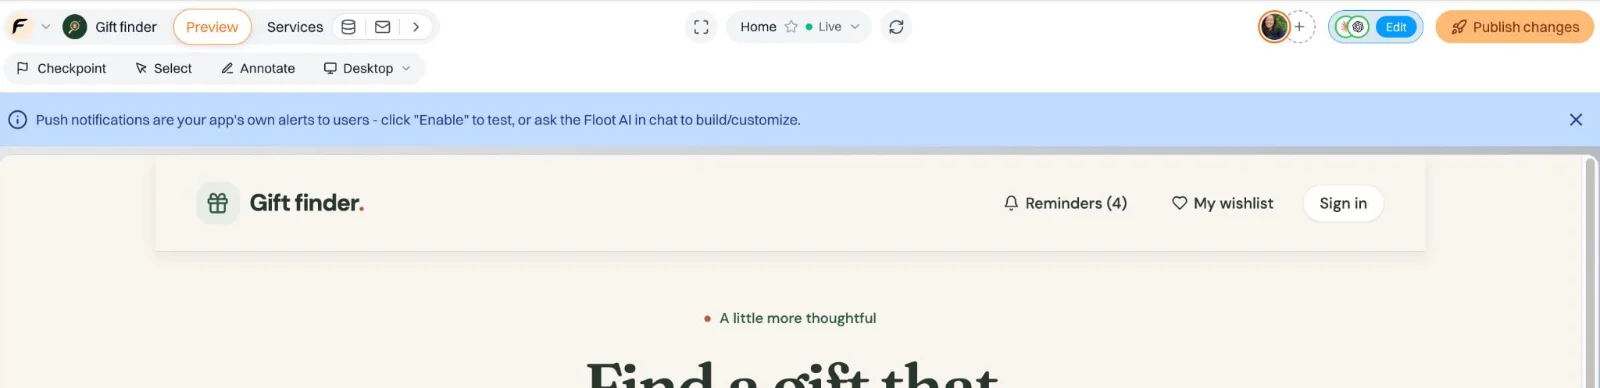
Figure 6 Floot's project preview exposes push-notification support while the feature is being developed.
Feature 2 Save something from another app
Sometimes, I come across a gift idea in a TikTok video and want to save it for later. Instead of copying the video URL, switching to Gift Finder, and pasting the link manually, I want to be able to tap the Share button in TikTok, select Gift Finder, and have the video URL automatically saved to my wishlist.
Ask your assistant:
Let people share a link or text from another iPhone app into Gift Finder using the native iOS share sheet. Make Gift Finder available as a share destination, receive the shared URL, and open a simple “Save something thoughtful” screen. Show the received link and an editable “Gift name” field with “Shared product” as a fallback.

Require the user to be signed in before saving. Save the item to that user's wishlist, keep its original URL, label it “Saved from another app,” and provide “View original product.”

If no reliable price or product title is available, say “Price not recorded” rather than inventing it. Keep the existing Share button for sending gifts out of Gift Finder.
4 Publish a private iPhone build
Now that I'd added the two new features, I was ready to test them together on my iPhone. My Apple Developer account was already connected to the Floot project, and I'd installed an earlier version of Gift Finder through TestFlight. This time, I needed a new build to test the updated features.
-
Open Publish in Floot and choose Internal publish.
-
Confirm that the people who should use the private app are listed under Invited users.
-
Turn Publish mobile app on and keep the Apple App Store connection selected.
-
Select Live, then click Publish internally. A temporary Test build uses preview data and stops working after four hours. A Live build avoids that four-hour limit, but Apple’s own limit still applies: TestFlight builds expire 90 days after upload, so you’ll need to publish a new build to keep testing after that.
-
Check both statuses: the private web publish and the iOS build. Finishing the website does not mean Apple has processed the mobile build yet.
Since I'd already published Gift Finder privately for the earlier web test, this time I was updating the private version and generating a new iPhone build for TestFlight.
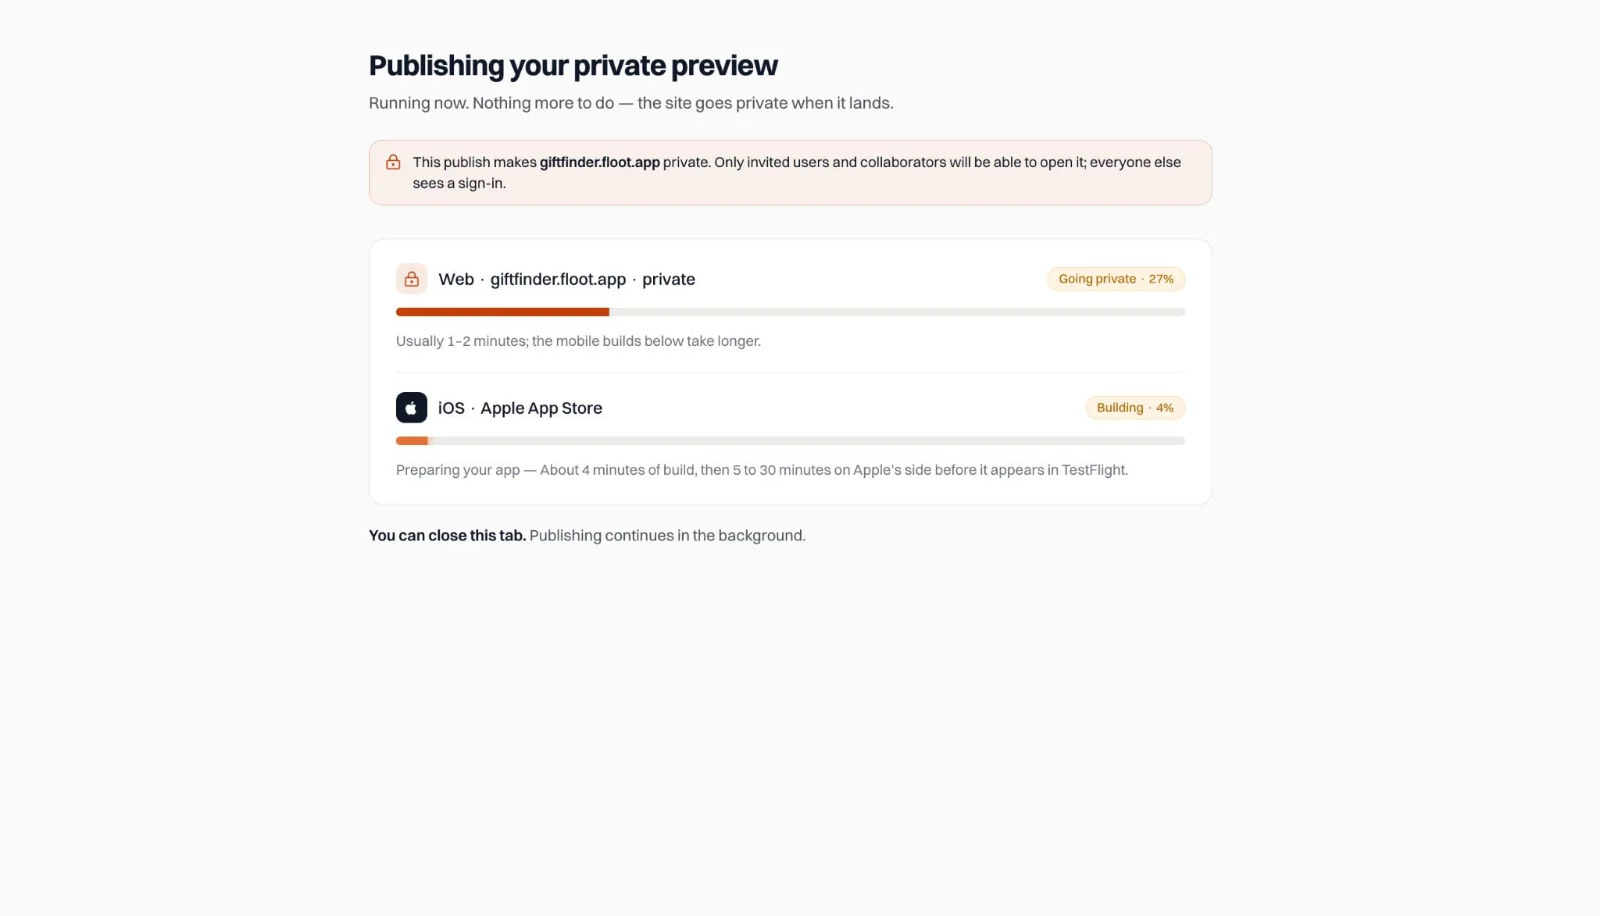
Figure 7 Floot publishes the private website and prepares the iOS build for TestFlight.
When processing is complete, open App Store Connect → TestFlight and install or update to the new build on the iPhone. Floot uploads builds to TestFlight after the Apple account is connected; you do not need to make a public App Store listing to run this test.
Also remember that an internal mobile app signs in through Floot first. If Gift Finder itself requires an account to access a private wishlist, the tester then signs in to Gift Finder as well.
5 Test the wishlist notification on an iPhone
To test this feature, I first opened the newly installed Gift Finder build through TestFlight, signed in, and went to my wishlist. I then enabled Notify me when someone views my wishlist and allowed notifications when iOS requested permission.
Next, I created a shareable wishlist link and sent it to my friend. Since I was testing the app using Floot's private publishing feature, I also needed to make sure my friend had permission to access the private site. Otherwise, they wouldn't be able to open the wishlist, even with the shared link.
Once everything was ready, I left Gift Finder running in the background and asked my friend to open the link.
A short while after my friend opened the wishlist, I received a notification on my iPhone!
Your wishlist got a visit! 🎁
Someone just viewed your shared wishlist.
This confirmed that the feature worked in my TestFlight build: when someone with access opened my shared wishlist, Gift Finder could notify me on my iPhone, even while the app was in the background.
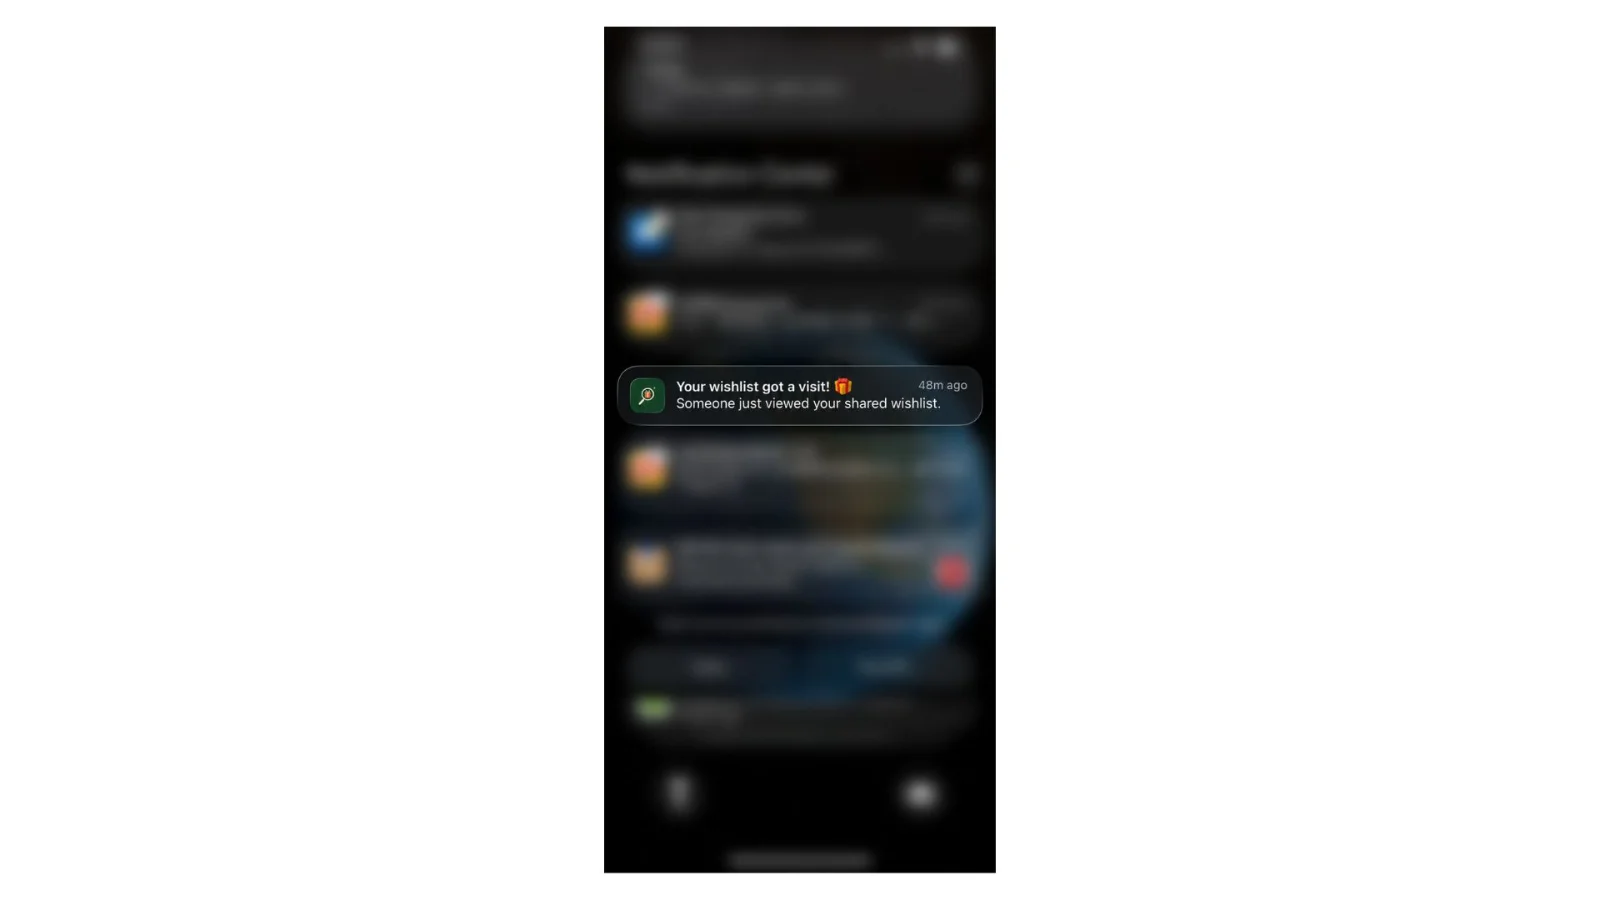
Figure 8 The iPhone receives the wishlist-visit push notification.
That gave me evidence that the event had reached the installed app, rather than simply showing a notification in the web preview.
If nothing arrives, check that you installed the new TestFlight build, notification permission is enabled on the iPhone, the Apple store connection was included when publishing, the correct user enabled alerts, and the tester actually reached the wishlist.
6 Test saving a TikTok link directly into Gift Finder
For the second test, I opened TikTok and found a Christmas gift-guide video. Instead of copying its URL, I tapped TikTok's Share action and selected the Gift Finder app from the iPhone share sheet.
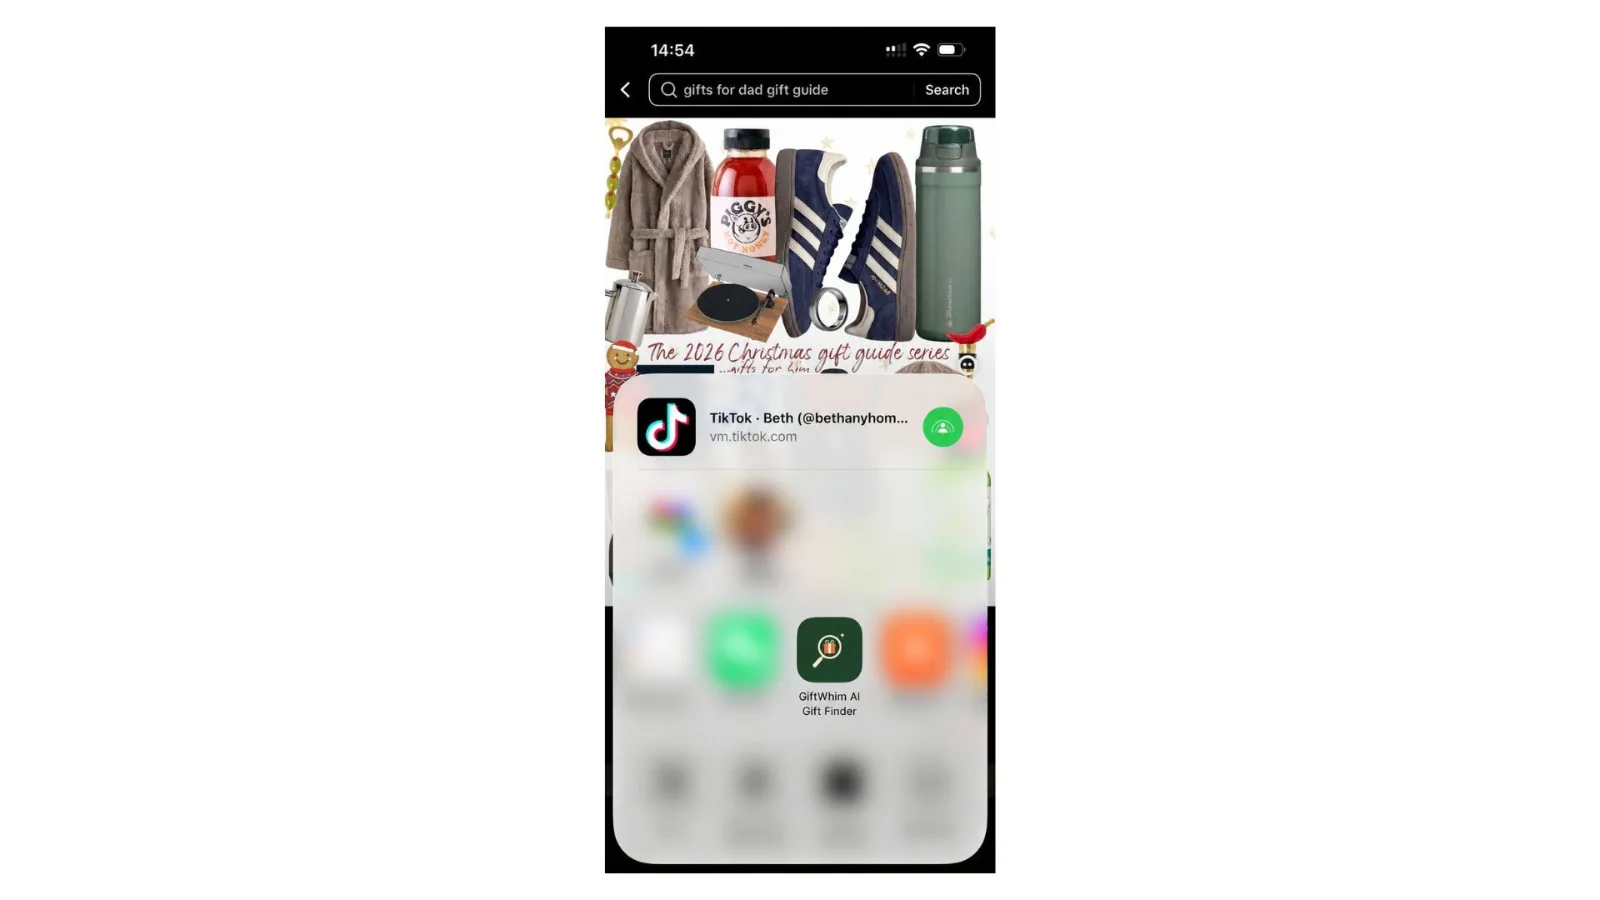
Figure 9 GiftWhim AI Gift Finder appears as a destination in TikTok's iPhone share sheet.
Gift Finder opened a screen called Save something thoughtful. The TikTok link had already been received. The gift name was editable, with Shared product as the default. I tapped Save to wishlist.
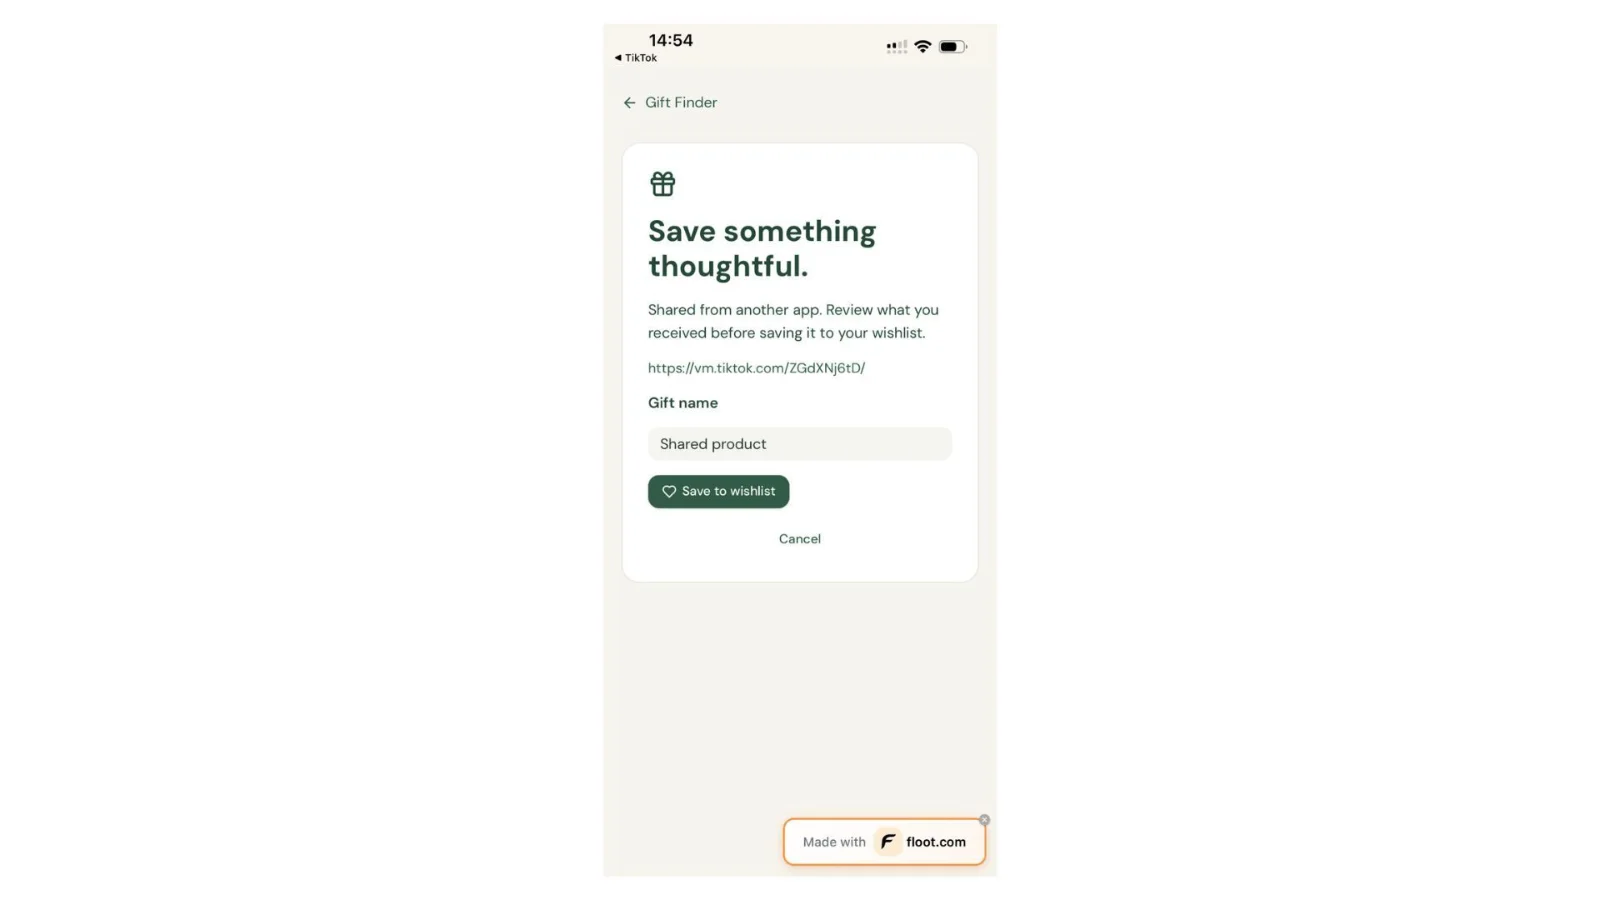
Figure 10 Gift Finder receives the TikTok URL and offers to save it to the wishlist.
You can find the product you shared with Gift Finder saved under your Wishlist.
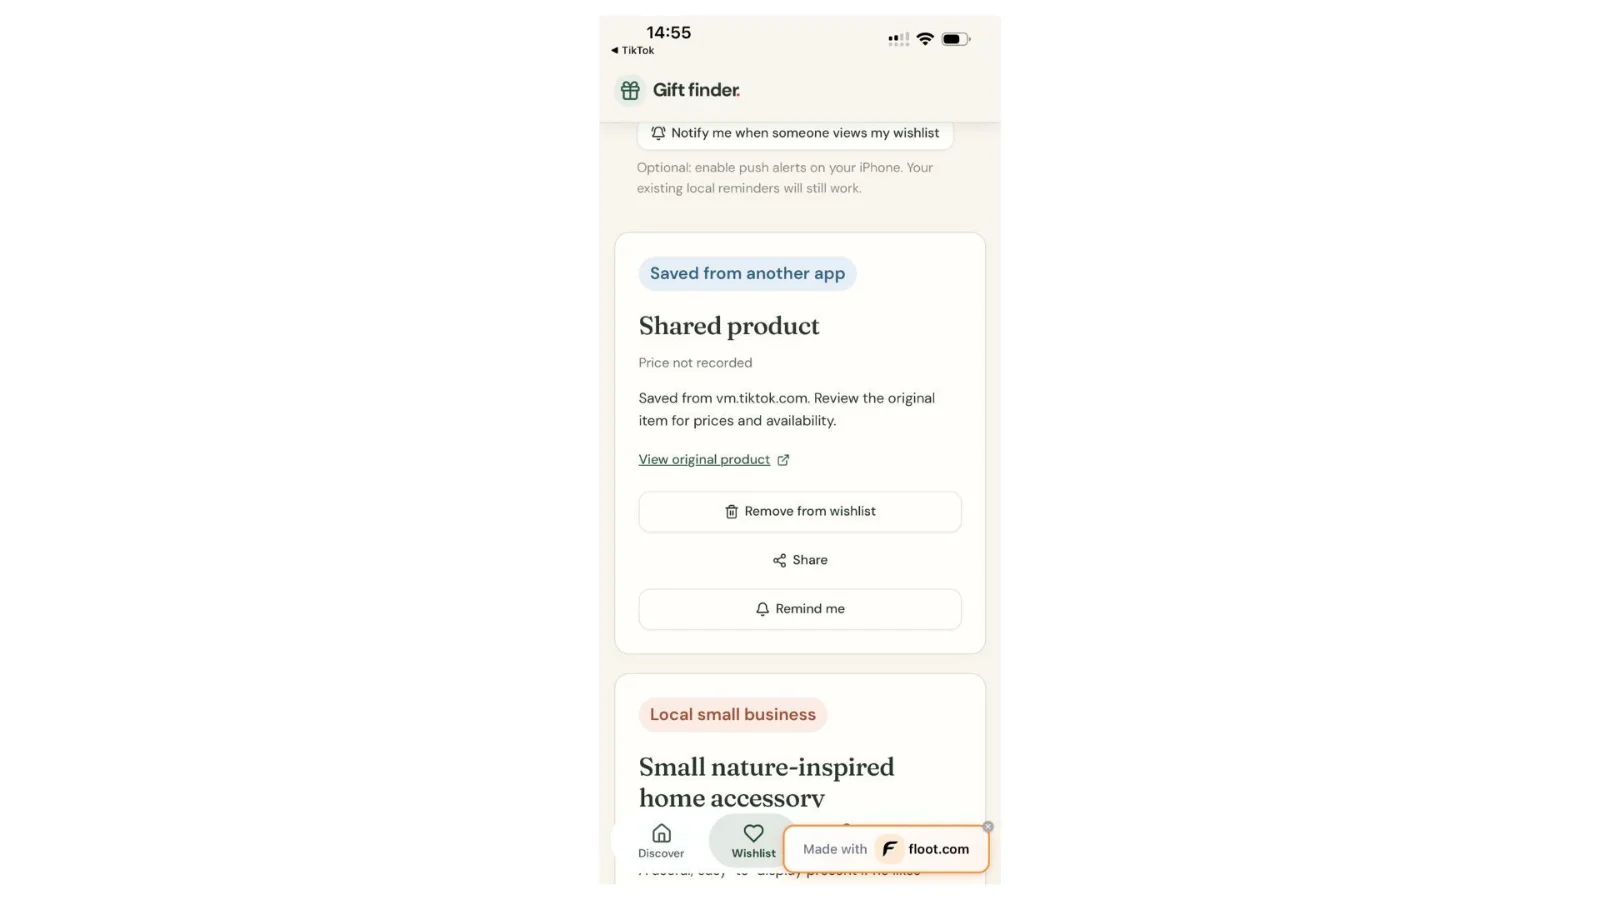
Figure 11 The TikTok link is saved as a wishlist item, with the original source available.
This is a useful distinction: receiving a link is not the same as extracting full product information. In my test, Gift Finder successfully saved the link, but it did not magically identify every product in the video or retrieve a reliable price.
7 See what testers actually did in the app
After inviting people to beta test Gift Finder, I also wanted to understand what they actually did inside the app.
Since Gift Finder already saves certain user activities in its own database, I could examine those records to piece together parts of their journey. Internal publishing controls who can access the app, while Gift Finder's own database stores the activities it was designed to record.
I opened Services → Data and selected the wishlist_gifts table, where each saved gift had a timestamp and an application user ID. In my test, user 7 had saved six gifts. I could then inspect other tables, including gift_shares and wishlist_view_notifications records, to better understand the sequence of recorded activities.
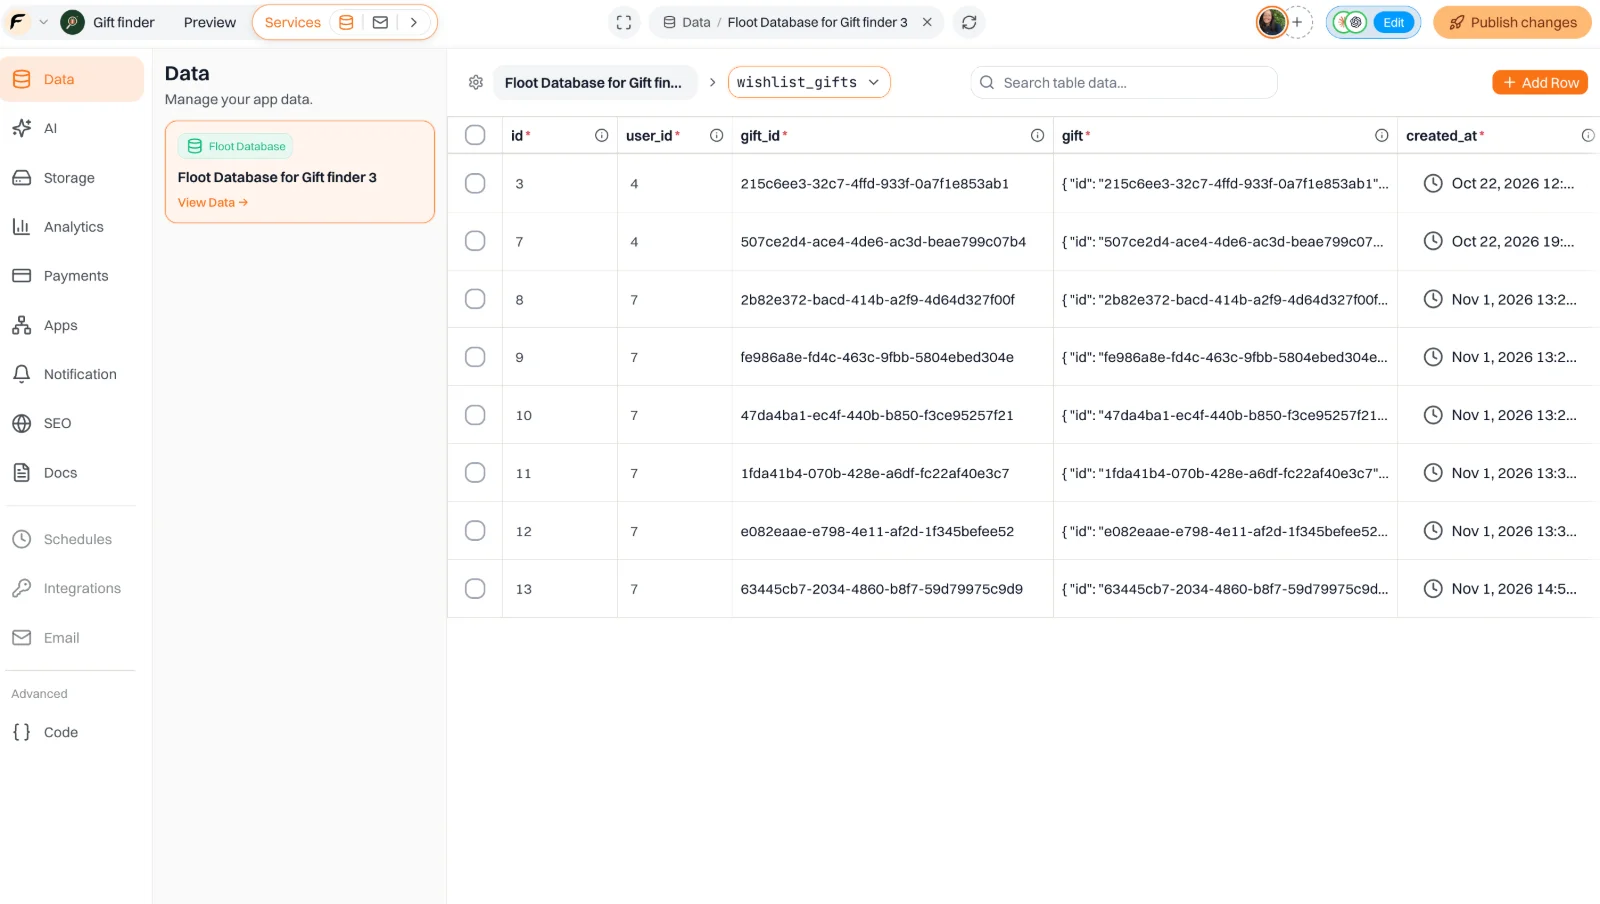
Figure 12 The wishlist_gifts table records saved items and their associated app user IDs.
Rather than reading every row myself, I also asked ChatGPT to build a timeline from the events Gift Finder saved in its own database. It put the available events in chronological order: registration, several saved gifts, wishlist sharing, another saved item, and notification-related activity. This was much easier to read than several separate tables.
Ask your assistant
Show me User 7’s journey through Gift Finder from the earliest to the latest recorded action. Check the relevant database tables, organise the activities by timestamp, and clearly identify anything that the app did not record.
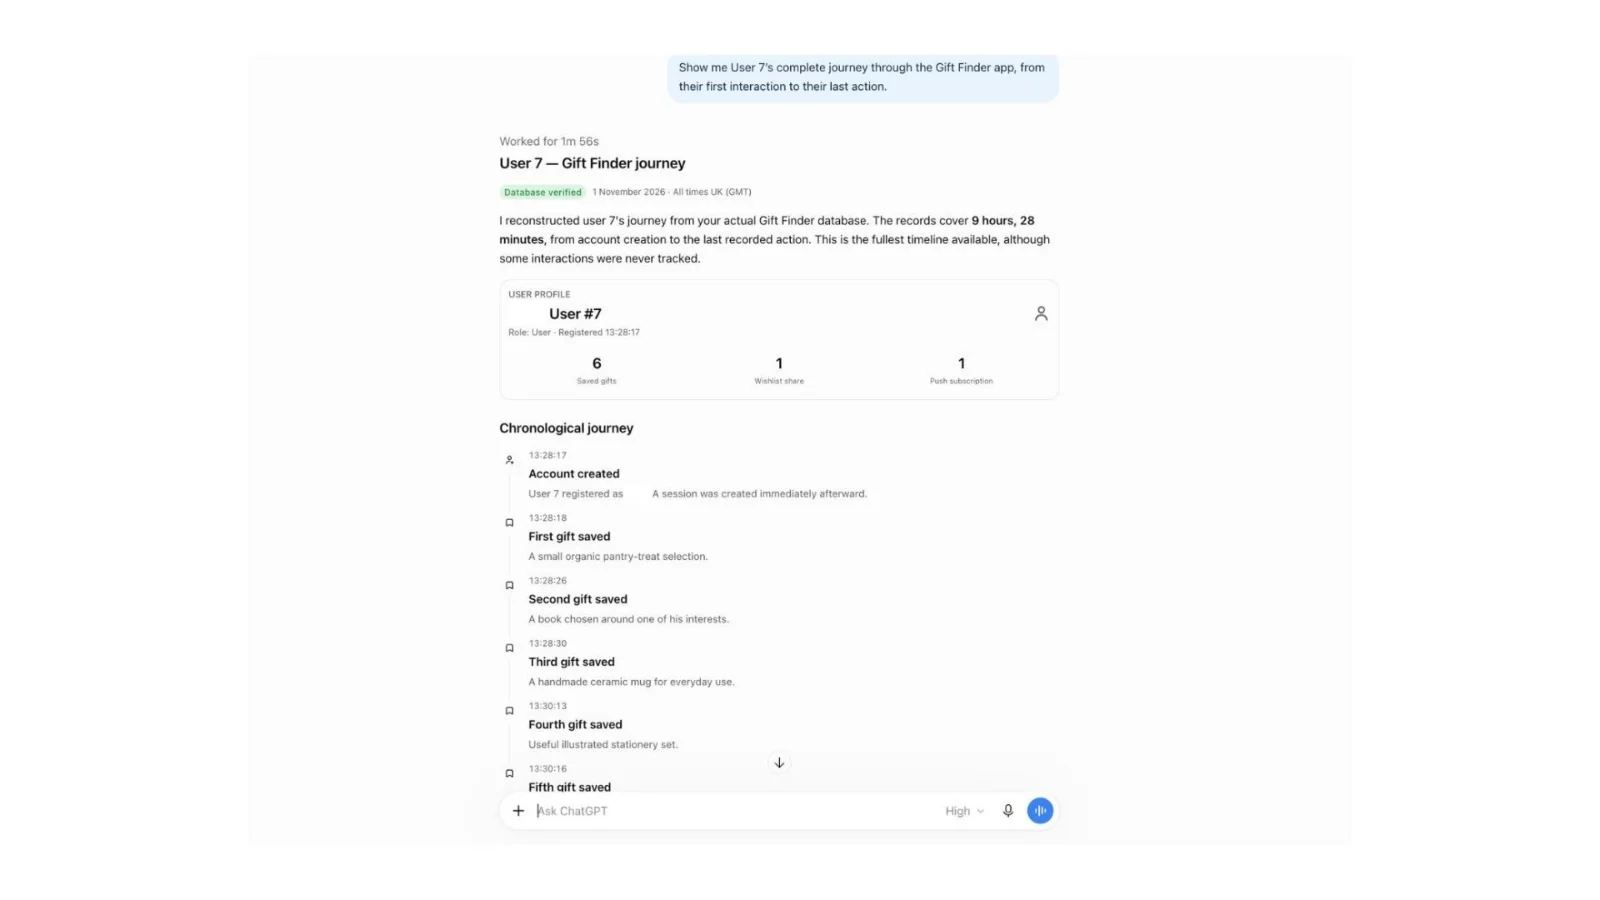
Figure 13 ChatGPT organises the available database records into a user-journey timeline.
8 Let different people test different experiences
Since you can see each user's subscription status in your project database, you can also set up different scenarios and invite people to test how your app behaves.
For example, Gift Finder has a feature that shows exclusive discounts to premium users. I wanted to test how this experience would look from a premium user's perspective.
So, I first invited my friend to sign up for Gift Finder. Once his account was created, I went back to my project database, opened the users table, found his account, and changed his plan to premium.
This allowed him to test the demo premium experience without making an actual purchase. The product prices and discounts shown in this example are illustrative, not real customer offers.
Besides subscription status, you can also assign different user roles, such as admin, editor, and viewer. This is particularly useful if you are building an admin panel or dashboard that involves multiple levels of access and permissions.
One thing worth mentioning is that internal publishing controls who can access your app, while the roles and subscription statuses defined in your app determine what each user can see and do.
Here is what the database looks like.
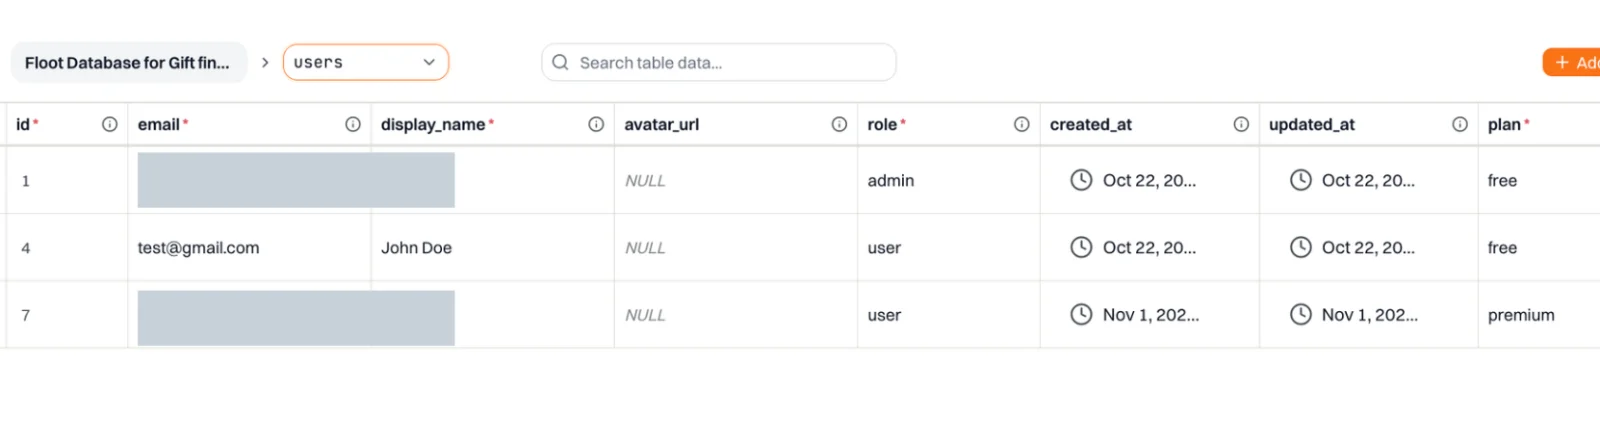
Figure 14 After my friend signed up, I changed his plan to premium in Gift Finder's users table for testing purposes.
And here is what the app looks like when my friend tests it as a demo premium user. You can see the exclusive discount section that becomes visible after I change his plan to premium.
The prices and discounts shown here are just for demonstration. No actual payment was made.
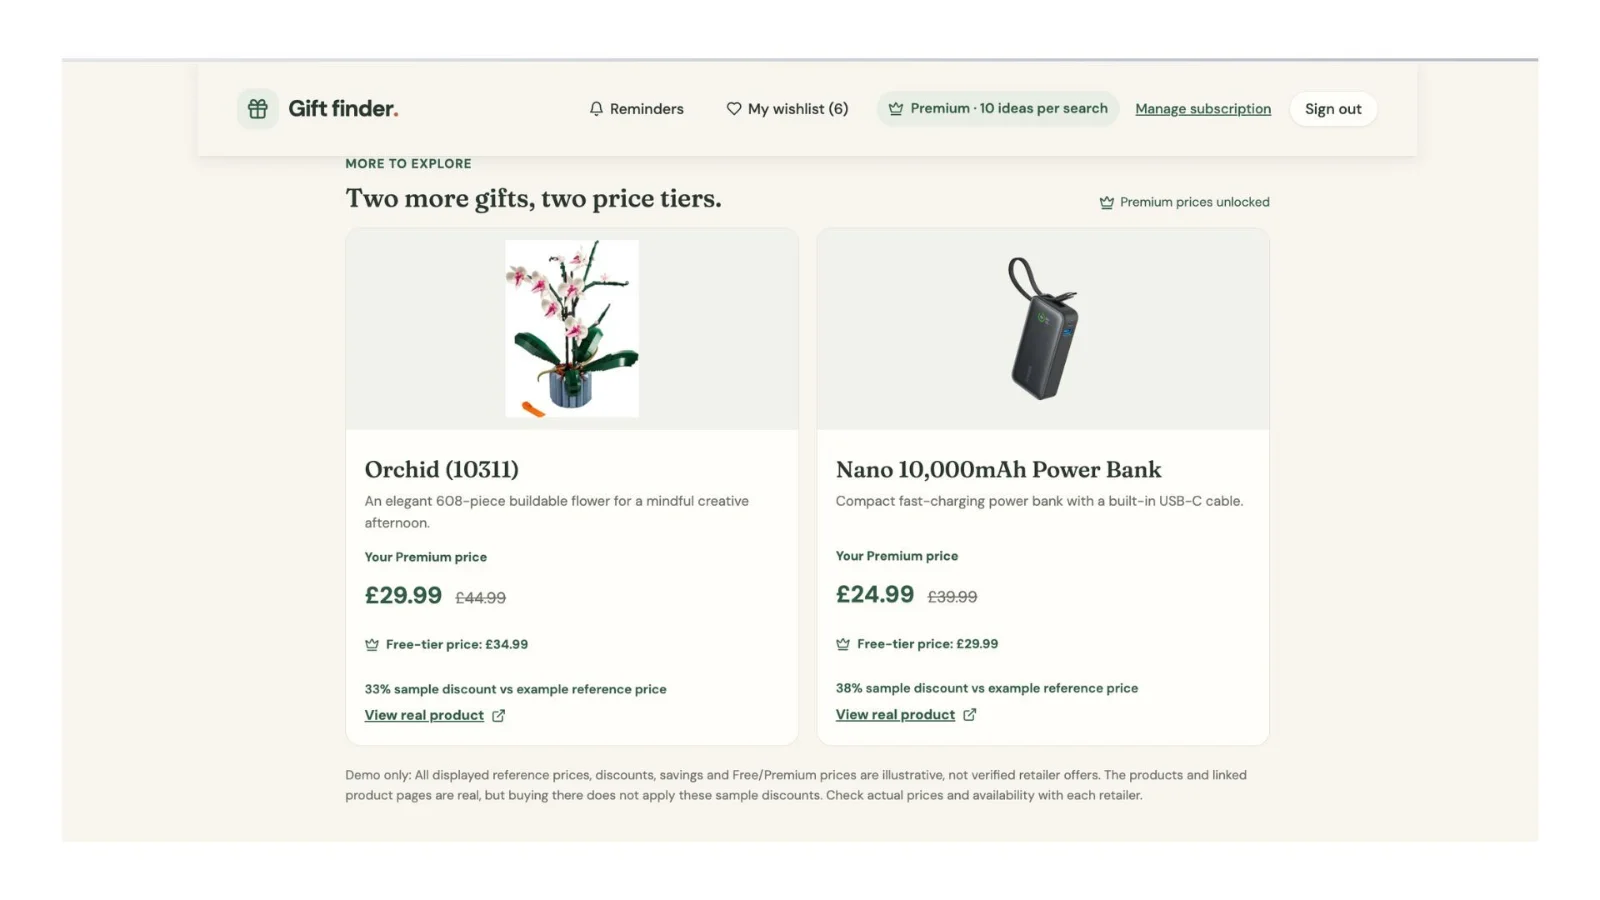
Figure 15 The demo premium experience shows illustrative product prices and exclusive discounts, without an actual purchase.
9 Organise testers into groups, not just one invitation list
According to Floot’s internal-publish documentation, Free accounts can invite five people in total across their apps. On paid plans, you can invite up to 20 people in total across all your apps. That is enough for a few small, targeted rounds of testing. If you need more, you can contact Floot support at support@floot.com to ask for a higher limit.
Even with a small list, it helps to invite different groups of people to test different aspects of your app.
I might ask Friends & Family to check the basic flow, Beta Community members to evaluate gift recommendations, and iOS Testers to focus on notifications and saving links from other apps. The trade-off is that Floot’s invitation list does not automatically sort users into those groups for me.
So, I asked my assistant to add a tester_groups table to my app's database. In my example, I created three groups: Friends & Family, Beta Community, and iOS Testers, each with a different testing purpose.
I could also create a tester_group_members table to organise the email addresses of people I planned to invite and assign them to the correct group.
Ask your assistant:
Create two tables in my app's database:

tester_groups: Store group names and testing purposes. Add three groups: Friends & Family, Beta Community, and iOS Testers.

tester_group_members: Store testers' email addresses, their assigned group (linked to tester_groups), and invitation status (Planned or Invited).

Keep it simple. No additional features or automation needed.
One thing worth mentioning is that these tables are only for organising testers inside my app. Adding someone to the database doesn't automatically invite them to access the private Floot app or install the iPhone version through TestFlight.
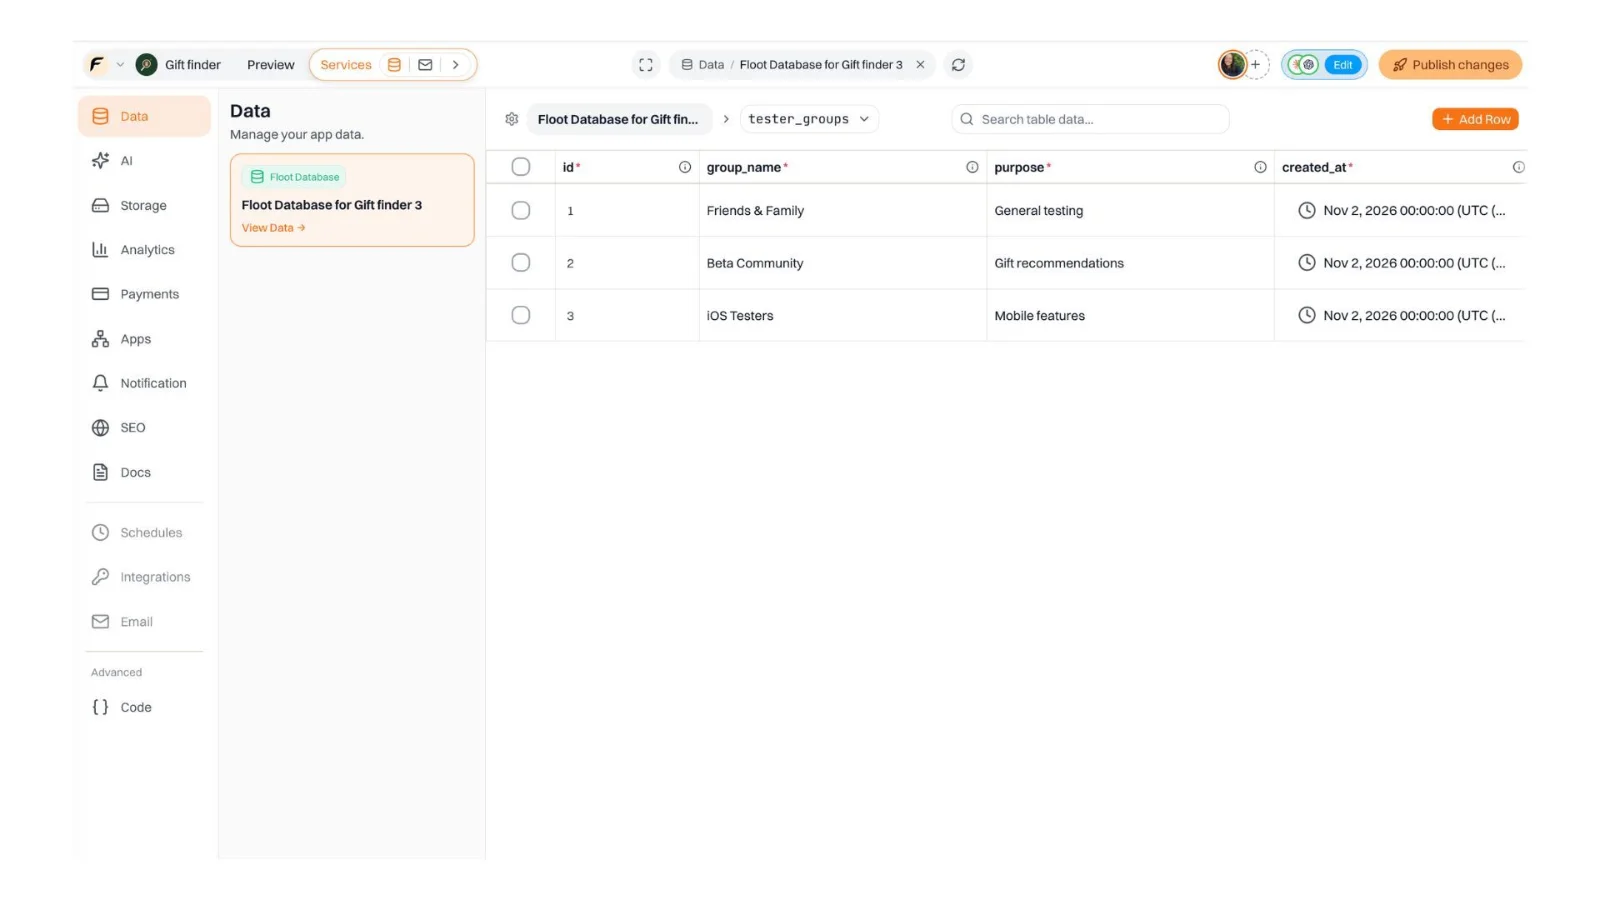
Figure 16 A tester_groups table separates groups by the feature or experience they should test.
For example, if I wanted to invite 15 people to test the iPhone app, and had enough invitation slots remaining on my paid plan, I could first prepare their email addresses in a spreadsheet, save them as a CSV file, and ask my assistant to import those rows into the tester_group_members table.
This would help me organise everyone under the iOS Testers group before sending invitations. I would mark their status as Planned, since adding their details to the database doesn't mean they've actually received an invitation.
The screenshot below illustrates how these membership records might look.
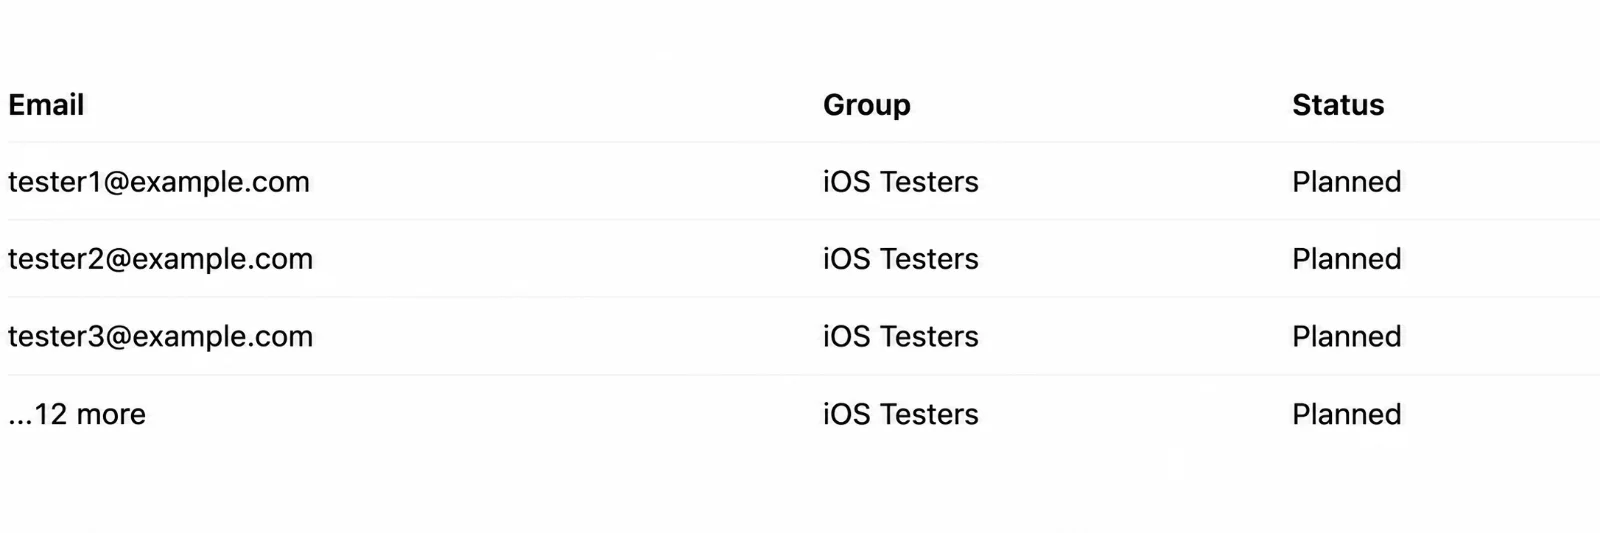
Figure 17 Example membership records for an iOS Testers group, marked as Planned before invitations are sent. The email addresses are illustrative.
How do I actually invite these testers?
Organising testers in the database is just the preparation step. To give them access to the app, I still need to invite them through the publishing platforms.
For iPhone testing, there are two separate steps:
-
Floot: Go to Publish → Internal publish → Invited users and add the testers' email addresses so they can access the private app.
-
TestFlight: Open App Store Connect → TestFlight and add the testers to an external testing group. This is separate from the Floot invitation. Friends and community testers who aren’t App Store Connect users can only be added through an external group, and the build must be approved for external testing before they can install it through Apple’s email invitation or a public TestFlight link.
This way, testers have permission to access the private app through Floot and can install the iPhone build through TestFlight.
My tester_group_members table simply helps me keep track of who I plan to invite and which features I want them to test. It doesn't replace either invitation process.
10 Keep an internal app private for good
If I am building something that should never become public by mistake, Floot offers another safeguard. Under Project Settings → Advanced Settings, I can turn on “Only allow internal publish.” Floot asks the project owner to confirm the change. Once it is enabled, the public Web publish option is unavailable and future publishes stay private. Turning it on also closes any preview links you’ve already shared. If your app is already public, publish it internally first, then turn on “Only allow internal publish.” Switching from public to private also takes the app offline for a few minutes.
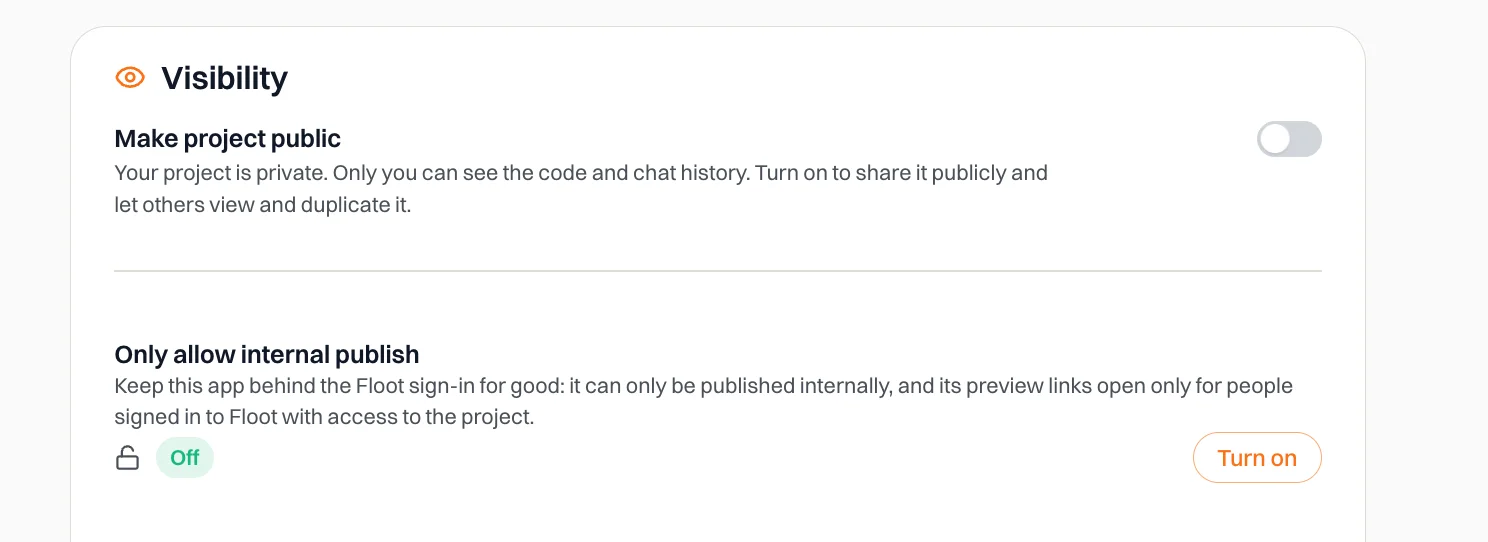
Figure 18 Turn on Only allow internal publish under Project Settings → Advanced Settings → Visibility to prevent your app from being published publicly.
Here is the trade-off when you switch an existing public app to internal publishing. Once you publish it internally, the website is no longer accessible to the public. Only invited people can access and test it.
But what if you already have a production app running, and you want to beta test some new features without affecting your existing customers?
Here is a workaround: Duplicate your Floot project.
If you're on a paid Floot plan, you can duplicate your existing project and use the copy for internal testing while keeping the original app publicly available. The copy starts unpublished at a new address, and your invited users aren’t carried over, so you’ll need to invite your testers again.
When duplicating the project, Floot gives you different database options. For an isolated beta test, choose Duplicate schema only if you want the same database structure but no existing records, or Duplicate with full data if you also need a copy of the existing records. Copying the project itself is not charged, but a separate database and a published copy have their own normal storage and hosting usage.
Avoid the default Share database option because that would connect your testing project to the original database. Changes made during testing could then affect your live app.
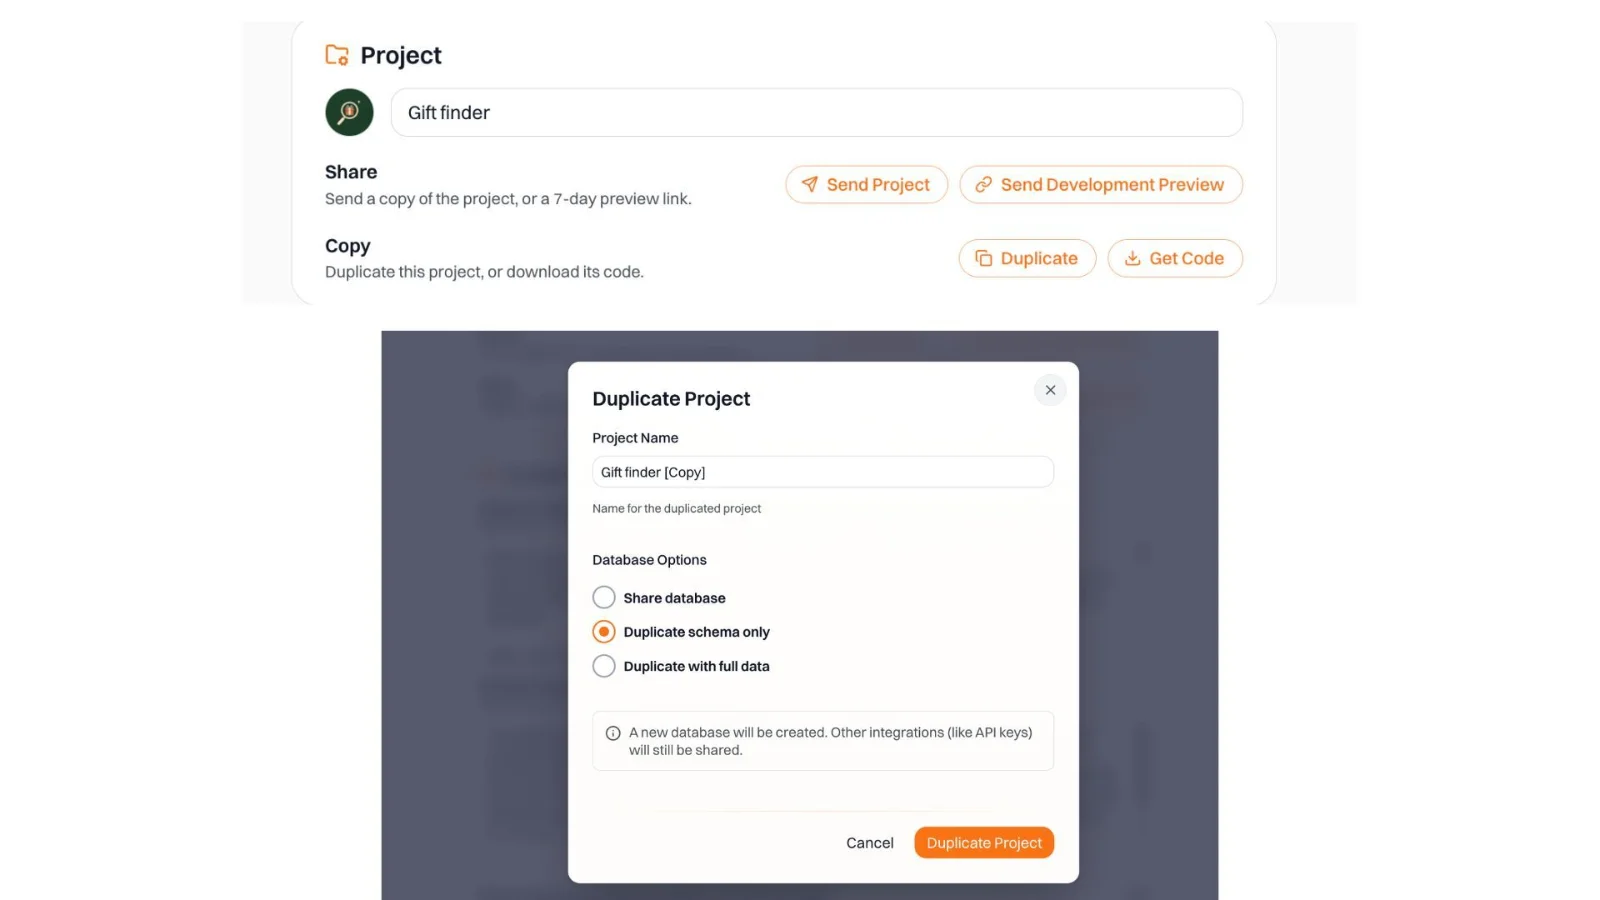
Figure 19 Top: Open your Floot project's settings and click Duplicate under the Copy section. Figure 20 Bottom: Select Duplicate schema only to create a separate database.
One thing worth mentioning is that duplicating a project doesn’t automatically isolate everything. The copy can still share live integrations with the original project, and any scheduled jobs are copied across too, although copied jobs don’t run until the copy is published. Before publishing it, check whether any connected services, copied scheduled jobs or automated actions could trigger real-world effects, such as sending emails, processing payments or updating external data.
If you also want to test the copy as a separate iPhone app, you'll need to set up its App Store connection and mobile app ID separately.
This way, you can keep your public-facing app running while using the duplicated project to experiment with new features, invite beta testers, and collect feedback before making changes to the live version.
Closing thoughts
What I like about internal publish is that it lets me separate getting feedback from launching publicly. I can show an unfinished idea to a friend, improve the parts that confuse them, and test native features on an actual iPhone, all before the app is released on the App Store.
I can also review the activities Gift Finder recorded in its database to better understand how testers use the app. By assigning different subscription statuses or roles, I can test different user experiences and make the whole testing process more comprehensive.
Xian Li
Xian Li is a first-time founder building in public and the writer of In Silico, In Soul, a newsletter about the mistakes, lessons and breakthroughs that come with creating a product from scratch.